Showing posts with label recipes. Show all posts

Thursday, August 4, 2016

Roasted Tomato Sauce

The tomato glut is in full force.  That means it is time to make tomato sauce, which is one of my favorite things from the garden.  I love roasted tomato sauce- it is delicious and it is very easy to make.  There is very little chopping or stirring, but you do need a food mill.

A batch of sauce makes about a pint and takes 4 pounds of tomatoes (I used a mix of Roma VF, Plum Regal, San Marzano and Amish Paste), a couple of sweet bell peppers, a small head of garlic, a few small onions, oregano and olive oil.


Everything gets roughly chopped except for the garlic, which is peeled and put in whole.  It all goes into a 9 x 13 inch pan.


Roast at 450°F for 1 1/2 to 2 hours, stirring every thirty minutes.  The tomatoes will get blackened and it will not look very pretty when it comes out of the oven.


Let it cool and run through a food mill.  I got my Victorio food strainer last year and it has been a wonderful addition to my kitchen and has made tomato season much easier and quicker to deal with.  The roasted ingredients go into the top, you push it into the mill, crank it and then it separates the thick sauce from the skins and seeds.


You end up with a delicious roasted tomato sauce that is thick and rich.  I have not canned this sauce because I'm not sure how acidic it is.  I'm a paranoid canner and only use recipes for canning that have been tested, so I freeze my tomato sauce in quart size bags.  There's nothing like the taste of roasted, homegrown tomatoes in the middle of winter.


Roasted Tomato Sauce

Ingredients

  • 4 pounds tomatoes, stemmed and quartered 
  • 1 large onion (or 2-3 small), roughly chopped
  • 2 small bell peppers, roughly chopped
  • 8 cloves fresh garlic
  • 1/4 cup extra virgin olive oil
  • 1 tablespoon dry oregano (or a handful of fresh oregano & basil)
  • salt and pepper to taste
Directions


  1. Combine ingredients in a 9x13 inch pan.
  2. Roast at  for 1 1/2 to 2 hours, until juices get thick.  Stir every half hour.  Tomatoes will get a bit blackened.
  3. Let cool, and run through a food mill to remove skins & seeds.  The resulting puree will be thick, so there is no need to reduce.
  4. Season to taste with salt and pepper.


Thursday, July 28, 2016

Mr. Stripey Heirloom Tomato Caprese Salad

Nothing is more summery than a big, juicy tomato fresh off the vine.  The first tomato always brings excitement.  It is usually the small cherry tomatoes, which are delicious and juicy balls of sunshine that you pop into your mouth as soon as they are picked.  The anticipation of the first big tomato is a summer tradition.  While the evening soundtrack of cicadas, crickets and tree frogs plays in the background, I walk the tomato row looking for signs of ripening.  I had my eye on a big Mr. Stripey with anticipation.  It was a giant tomato and seemed to take forever to ripen.

Finally the moment came.  Time to harvest the first big tomato of the year:

Mr. Stripey Tomato: 1 lbs, 2 oz
This is my first year growing Mr. Stripey.  It is an heirloom variety that was discovered by Wayne Hilton in Georgia.  The reason I added him to my grow list, other than his cool stripes and giant size, is that it is an heirloom tomato that has been shown to have very good resistance to late blight.  With hot and humid summers in South Carolina, late blight always shows up in my garden.  Any disease resistance is a positive trait to have.  It is an indeterminate tomato that can grow very large, which I luckily have room for.  I just hope it doesn't get so tall that I can't reach the tomatoes!


What to do with this big, beautiful tomato?  I wanted to highlight it's loveliness and flavor, so I felt a Caprese salad would be perfect.

I assembled some simple ingredients: a big Mr. Stripey tomato, fresh mozzarella, garden fresh basil, olive oil, salt and pepper.


I sliced the tomato and the mozzarella into 1/4 inch slices.  Just look at that beautiful tomato!


Then I layered a tomato slice, a mozzarella slice and topped it with a basil leaf.  I kept making stacks and then drizzled with olive oil and sprinkled with salt and pepper.


A beautiful and delicious way to enjoy the first big tomato of summer.  Mr. Stripey has a low acid content, which means that the sweetness comes out.  It is not a strong or tart tomato, so a simple dish highlights its flavor without drowning it out.


If you decide to grow Mr. Stripey, be sure to not overwater.  They are prone to cracking and have a better taste with less water.

Savor those fresh garden tomatoes... summer is fleeting!

Wednesday, July 20, 2016

Cooking with Cucumbers

Yes, you read that correctly.. cooking with cucumbers.  If you are surrounded by cucumbers, then I may have some yummy help for you.

I tend to grow too many cucumbers.  Last year I canned over 40 jars of pickles.  The problem is that we are not big pickle eaters.  Everyone I know got pickles for Christmas and any other holiday or occasion I could think of.  I'm trying to start a new gift giving trend!  I've already harvested over twenty pounds of cucumbers this year.  I still have nine jars of pickles in the pantry from last year and just added eight new ones.

I decided it was time to look for other options to use cucumbers besides pickling!

Thanks to Google searching I discovered that you can make cucumber bread much like zucchini bread.  I decided to try making Eggless Chocolate Cucumber Banana QuickBread because I figure that everything tastes better with chocolate!

I assembled the ingredients: flour, dried cherries, vanilla, almonds, salt, sugar, olive oil, bananas, cinnamon, allspice, cucumbers and cocoa  The recipe ended up using two cucumbers, so this is probably not going to put a dent into my cucumber supply unless I eat a ton of bread!  However, friends, relatives, coworkers and neighbors may be more happy to receive bread instead of another jar of pickles!


Tip:  Use a food processor to grate the cucumber.  I didn't and would have preferred smaller pieces and less cucumber chunks in the bread.  I then mashed up the banana, mixed the rest of the ingredients, put it in the oven and waited.


Out came my first ever cucumber bread:


I honestly did not taste a drop of cucumber in the bread.  I used the Special Dark cocoa powder, which gave it a very strong chocolate flavor to mask any hint of cucumber.  It did turn out very, very moist.  Tip:  Drain the shredded cucumber to reduce the moisture.  I also wouldn't mind if it was a bit sweeter, which is probably because of the dark cocoa powder I used. 

Overall, this was a delightfully different way to eat garden fresh cucumbers!  Do you have delightfully different ways to use cucumbers?  If so, I would really like some suggestions before I get buried in pickles, again!

Shared on the Homestead Hop.


Wednesday, July 13, 2016

Canning Banana Peppers

July in the garden is filled with blooms, produce, and lots of sunshine along with humidity.  These are the days when the garden must be enjoyed in the morning and the evening to avoid melting in the sun.  I'm always amazed that the garden plants can thrive with so much sunshine.


The peppers love the heat.  My banana pepper plants are not very big, but they are loaded with fruit.  Usually the tomatoes are ahead of the peppers for harvesting, but this year the roles are reversed.  It was time to harvest and do something with my abundance of banana peppers.


I harvested a little over 2 lbs of banana peppers.  Domino poses with the bounty while keeping an eye out for rabbits and squirrels.  It seems the rabbits are getting closer and closer to the garden this year.  I haven't noticed any damage inside the garden, yet.  Domino isn't the only one looking out for rabbits.  The other day J saw a large coyote just beyond the garden!  I guess the good thing is that the rabbits have a natural predator; the bad thing is that I worry about Domino having a run-in with a coyote.


As the sun gets higher in the sky and Domino pants more and more, we take our harvest into the kitchen.   Here peppers are washed and chopped.  I was smart this year and used rubber gloves for handling the peppers.  Even though banana peppers are not that spicy, I always manage to touch my eye.  The worst was when I put my contacts in after handling banana peppers.  The oils transferred to my contact and the burning and tears wouldn't stop, so I had to put the pepper contaminated finger back into my eye to take out the contact.  Lesson learned!


Then I cleaned the jars and filled them with a boiling vinegar mixture.  The recipe I used came from the So Easy to Preserve book from the University of Georgia. The ingredients, other than peppers, include cider vinegar, canning salt, mustard seed and celery seed.  I have now added, "grow mustard for seed" to my list of things to do.  I've never grown mustard because I'm not fond of the greens, but I never thought about growing them for seeds.  Finally, the filled jars are placed into a steaming water bath.


Out comes preserved banana peppers.  Summer heat and sunshine are captured in each jar and can be enjoyed long after the season has passed.


Shared on the Homestead Hop.


Sunday, July 10, 2016

Roasted Summer Garden Vegetables

Summer brings an abundance of veggies from the garden.  After all the planning, planting, tending and growing it is time to reap the rewards, but that means I need to do something with all those veggies.  This week brought yellow squash, zucchini, green (and purple) beans, peppers and okra.


I'm not a fan of okra, but yet grew it, so after searching for recipes I decided that I should try roasting it.  I preheated the oven to 400 degrees and then chopped all the veggies and tossed them with olive oil and sprinkled with salt.  I kept all the vegetables separate on the baking sheet since they would take different amounts of time to roast.  In retrospect, I would start with the vegetables that took the longest (zucchini and squash) and then add the okra, followed by green beans and peppers.


To turn my roasted vegetables into a meal, I cooked some brown rice in the rice cooker and then made some basil-walnut pesto and tossed it with chickpeas.


The result was brown rice topped with garden fresh roasted vegetables, pesto chickpeas, a sprinkling of Parmesan and garnished with basil.  I am pleased to report that the okra was not slimy.  I was concerned when I put the gooey blob of okra onto the baking sheet, but after roasting it was crisp and do I dare say delicious? Well, at least I will say that when the okra was mixed with the rest of the roasted vegetables it blended into a delicious dish.

Thursday, June 12, 2014

Cooking Amaranth Leaves

This is my first year attempting to grow amaranth.  My intention was to grow it for it's grain.  If you've never had amaranth grain, it's a very nutritious and high protein grain.  I mix it with my oatmeal along with apples and pecans for a delicious and filling breakfast.  I have also cooked with amaranth flour to make waffles and muffins.

When it came time to plant amaranth, I spaced them a foot apart so that they can grow tall, flower, and produce grains.  I had to thin the seedlings, which is when I learned you can also eat amaranth leaves.  My first thinning were young leaves, which added a colorful addition to my salads.


I wanted to know what cooked amaranth leaves tasted like, so I let some of the seedlings get about two feet tall and then picked some leaves.


As the leaves get larger they are a mix of green and red.  I heated up some oil, chopped the leaves, and minced some garlic.


I sauteed them for about five minutes and here is the finished product:


Well, I don't think any cooked greens are very photogenic.  What is important is how they taste.  To me they tasted like a mix between spinach and collard greens, but you know what I forgot to add... salt!  I don't add salt a lot when I cook, so I completely forgot, but salt seems to make a big difference in cooked greens.  Next time I will definitely add salt.  I would say amaranth leaves aren't as good as spinach, but much better than turnip greens.  The best part about amaranth is that they like the heat, so in the South it is a way I can have some greens long after the spinach and kale have said goodbye to the summer heat and humidity.

This post is shared at Green Thumb Thursday at Grow a Good Life.

Thursday, July 26, 2012

Thursday's Kitchen Cupboard: Tomatoes

It's tomato time in my garden!

First up in the tomato cooking spree is some oven-roasted tomatoes:


I take the Yellow Pear tomatoes, cut them in half, drizzle them with some olive oil, throw in some garlic and basil, and then cook on 225 for about 4 or 5 hours until they are shriveled up.  These are like candy to me.  I want to freeze some to have for pizza toppings after tomato season has ended, but I keep eating them!  Maybe the next batch will make it to the freezer... maybe.

Next on the tomato cooking frenzy is sauce... wonderful, yummy tomato sauce.  I've got to figure out a way to plant more tomatoes because I want more sauce!


My sauce recipe:

4 lbs tomatoes, peeled, seeded, and chopped
2 onions, chopped
1 bell pepper, chopped
4 cloves garlic
1/4 cup olive oil
1/4 cup basil
a few parsley sprigs
1 tsp salt

Heat the olive oil in a large sauce pan, add onions and cook for 2 minutes, add the bell pepper and cook for 2 more minutes, add the garlic and basil and cook for 1 minute.
Add the tomatoes, parsley, and salt.  Bring to a boil and simmer for about 2 hours until the sauce thickens.  I usually puree about half of the sauce because J is not a fan of chunky sauce.

Finally on the tomato cooking spree was salsa.  I used this Easy Blender Salsa Recipe, but I have no cilantro in the garden and was to lazy and splattered with tomato juice and seeds to go to the store.  I wonder if frozen cilantro would work?  I must remember to freeze some cilantro this winter when cilantro grows around here.  Without cilantro, the salsa was just ok.  I put it on bean burritos and completely forgot to take a picture.

That's what has been cooking in my kitchen.  If you want to peak into other kitchens and see what others are cooking, head over to Thursday’s Kitchen Cupboard at the Gardener of Eden.

Friday, June 29, 2012

Thursday's Kitchen Cupboard

I'm a day behind this week!  The main thing happening in my kitchen this week was making the first batch of pickles:


I learned how to water bath can last year, so I had to refresh myself on what to do since it has been awhile.  The dill pickles I make are very simple- they are the Ball dill pickle mix.  I have a recipe book called So Easy to Preserve that has many canning recipes including several for pickles.  However, last year when I was preparing for my first batch of pickles and was standing in the store checkout line with jars, the woman behind me started talking about making pickles.  She said she's tried countless recipes including grandma's recipe and by far the best and crispiest are the Ball dill pickle mix.  Since I knew nothing about canning, I thought I would give it a try.

Last year the cucumbers had a prolific year and I had far more pickles than I could ever eat, so I gave out pickles to lots of friends and family.  Everyone loved the pickles and are already asking about them this year, so now I feel that I need to stick to the same recipe.  I did make a batch of sweet gherkins last year from the So Easy to Preserve book and they are my favorites.  However, they require five days of soaking and changing the liquid and I didn't have the motivation for that, but hopefully sometime this summer I will make them.  Unfortunately the cucumbers do not seem to be thriving this year.  I've started some more seeds, but it's going to be awhile before they mature. 

That's what has been cooking in my kitchen.  If you want to peak into other kitchens and see what others are cooking, head over to Thursday’s Kitchen Cupboard at the Gardener of Eden.

Thursday, June 14, 2012

Thursday's Kitchen Cupboard

We've been eating plenty of goodies from the garden this past week.  I made mashed turnips to go with lentil loaves (1).   A roasted swiss chard and potato cake that tastes better than it looks in the photo.   I followed the recipe, except the only cheese I had on hand was cheddar. With the potato harvest I couldn't resist making fries (3).  For lunch, I've been eating lots of cucumber sandwiches (4).  I love crispy fresh cucumbers with cream cheese and a few mint leaves.   The first pepper harvest was chopped with some onions (5) and made into quesadillas (6).  I also made a delicious blackberry cobbler, but neglected to take a picture while devouring it!


That's what has been cooking in my kitchen.  If you want to peak into other kitchens and see what others are cooking, head over to Thursday’s Kitchen Cupboard at the Gardener of Eden.


Thursday, June 7, 2012

Thursday Kitchen Cupboard... Tromboncino Squash

This week's post isn't really a recipe- it is a taste test.  This is my first season growing tromboncino squash in an attempt to outsmart the vine borers.  Tromboncino squash can be picked young and used as a summer squash or you can let it grow big and use as a winter squash. 

It has a long skinny neck and a bulb shaped base.  Only the bulb end has seeds.


Here's what it looks like on the inside:


I sauteed it in some butter:


The texture is a bit thicker and meatier than zucchini, so it took a bit longer to get tender.  I then just sprinkled it with salt and pepper.


The taste test: it tastes like zucchini to me!  I've read that it is suppose to have a nuttier taste, but I didn't notice.  J also approved of the tromboncino squash and was in agreement that it tasted like zucchini.  I'm excited to finally have a summer squash despite the vine borers!

That's what has been cooking in my kitchen.  If you want to peak into other kitchens and see what others are cooking, head over to Thursday’s Kitchen Cupboard at the Gardener of Eden.

Thursday, May 31, 2012

Thursday Kitchen Cupboard.. Pasta, Peas, and Pesto

I was rummaging in the freezer this week and saw that I still have frozen pesto from the fall.  My basil in the garden is quickly growing, so it was time to use up last year's harvest to make room for new pesto.  With pesto in mind and peas in the garden, a pasta, peas, and pesto recipe was perfect!  I found the original recipe on food network.  However, I made quite a few changes. 

Pasta, Peas,and Pesto


Ingredients
  • 3/4 pound rotini pasta
  • 1/8 cup good olive oil
  • 3/4 cup pesto
  • 1 lb chard
  • 1 1/2 tablespoons lemon juice
  • 2/3 cup ranch dressing
  • 1/4 cup shredded mozzarella
  • 3/4 cup peas
  • 1/4 teaspoon kosher salt
  • 1/4 teaspoon freshly ground black pepper
Directions
Cook the pasta in a large pot of boiling salted water for 10 to 12 minutes until the pasta is al dente. Drain and toss into a bowl with the olive oil. Cool to room temperature.
Wash, dry, and chop the chard.  Saute the chard until it begins to wilt.  Drain any excess liquid.
In the bowl of a food processor, puree the pesto, cooked chard, and lemon juice. Add the dressing and puree. Add the pesto mixture to the cooled pasta and then add the mozzarella, peas, salt, and pepper. (I like peas fresh out of the shell with no cooking, but it you don't care for slightly crunchy peas cook them before adding to the pasta).  Mix well, season to taste, and serve at room temperature.


This was a great pasta salad for our Memorial Day cookout!  That's what has been cooking in my kitchen.  If you want to peak into other kitchens and see what others are cooking, head over to Thursday’s Kitchen Cupboard at the Gardener of Eden.


Thursday, May 24, 2012

Thursday Kitchen Cupboard...Veggie Pot Pie

With plenty of peas this week and carrots from a couple of weeks ago, I thought it would be a good week to make a pot pie.  I'm always trying different crust recipes. I want a healthy crust (wheat flour and olive oil), but not too wheat tasting.  Guess it is silly to want a wheat crust that doesn't taste like wheat!  This one was pretty good, but I'll keep searching for that perfect crust recipe.  This recipe is an adaptation from the Vegetarian Times Complete Cookbook.  I actually made two smaller pies and added chicken in one.  

Veggie Pot Pie

Crust
1 cup of all-purpose flour
1 cup wheat pastry flour
1/2 tsp salt
4 tbsp vegetable oil

Filling
1/2 cup vegetable stock
1/2 onion, chopped
1 cup carrots, chopped
1 cup peas
2 potatoes, boiled and cut into cubes
1/3 cup wheat flour
1/2 cup milk
1 cup vegetable stock
2 tbsp fresh parsley
1/2 tsp thyme
1/4 tsp sage
1 tsp soy sauce
1/4 tsp pepper

To make crust:
Preheat oven to 400°F. Whisk together flours and salt in bowl. Stir in oil until clumps form. Add 6 to 10 Tbs. cold water, 1 Tbs. at a time, until dough holds together. Shape into ball, cover with damp towel, and set aside.


To make filling:
Heat the stock on medium high heat in a saucepan, heat to a simmer and add onion.  Cook, stirring, for 3 minutes.  Add the carrots, peas and potatoes.  If the mixture begins to dry out, and 1/4 cup more stock.  Cook, stirring, for 3 minutes more.

Lower the heat and sprinkle the flour over the mixture; cook, stirring, for 2 minutes.  Combine the milk and stock in a measuring cup.  Slowly whisk the liquid mixture into the vegetables.  The sauce will start to thicken.  Add the parsley, soy sauce, sage, thyme, black pepper.  Cook, stirring constantly, until the mixture thickens.  Remove from heat.


Roll out the crust and place in bottom of casserole dish.  Fill the the dish with the vegetable mixture and top with remaining crust.  Bake until the crust is golden brown and the filling is bubbling, about 20 - 30 minutes. 


That's what has been cooking in my kitchen.  If you want to peak into other kitchens and see what others are cooking, head over to Thursday’s Kitchen Cupboard at the Gardener of Eden.

Thursday, May 17, 2012

Thursday Kitchen Cupboard... Beet and Goat Cheese Salad

I've been eating a lot of salads lately.  I'm not complaining, I really love salads, but sometimes I get in a salad rut.  Today's recipe is my attempt to avoid a salad rut.  The recipe comes from the food network:

Beet and Goat Cheese Arugula Salad

Ingredients
  • 1/4 cup balsamic vinegar
  • 3 tablespoons shallots, thinly sliced (I used onion)
  • 1 tablespoon honey
  • 1/3 cup olive oil
  • Salt and freshly ground black pepper
  • 6 medium beets, cooked and quartered
  • 6 cups fresh arugula (I used a mix of lettuces)
  • 1/2 cup walnuts, toasted, coarsely chopped
  • 1/4 cup dried cranberries 
  • 1/2 avocado, peeled, pitted, and cubed
  • 3 ounces soft fresh goat cheese, coarsely crumbled
Directions
Line a baking sheet with foil. Preheat the oven to 450 degrees F.

Whisk the vinegar, shallots, and honey in a medium bowl to blend. Gradually whisk in the oil. Season the vinaigrette, to taste, with salt and pepper. Toss the beets in a small bowl with enough dressing to coat. Place the beets on the prepared baking sheet and roast until the beets are slightly caramelized, stirring occasionally, about 12 minutes. Set aside and cool.

Toss the arugula, walnuts, and cranberries in a large bowl with enough vinaigrette to coat. Season the salad, to taste, with salt and pepper. Add beets and sprinkle with the avocado and goat cheese and serve.


No salad rut here!  If you want to peak into other kitchens and see what others are cooking, head over to Thursday’s Kitchen Cupboard at the Gardener of Eden.

Thursday, May 3, 2012

Thursday Kitchen Cupboard.. Quinoa and Chickpeas

Today's recipe is a random concoction that started with a colorful quinoa mix and what was available in the garden. If you are not familiar with quinoa it is a high protein grain that has a nutty taste- super duper healthy for you!  Here's my good for you recipe to balance the yummy dessert from last week:

Quinoa and Chickpeas
1/2 cup quinoa
1 cup water
1 tsp olive oil
1/4 cup chopped onion
2 chopped carrots
garlic powder
1 can chickpeas
2 cups Swiss chard
balsamic vinegar dressing
cilantro

I added the quinoa and water to my rice cooker.  Meanwhile I heated up the olive oil and sauteed the onions for about three minutes and then added the carrots and garlic powder (I can't wait to have my own homegrown garlic, but that's still months away and somehow I had neglected to buy garlic!).  I cooked the carrots until they were tender and then added the chickpeas and Swiss chard.  I cooked until the chard wilted and then added the bean and veggie mix to the cooked quinoa.

You could eat this either warm or cold as a salad.  I had it as a salad (it's been 90 degrees all week here!) and added some balsamic vinegar dressing because it was honestly a bit bland.  I then topped it with a few sprigs of cilantro.


That's what has been cooking in my kitchen.  If you want to peak into other kitchens and see what others are cooking, head over to Thursday’s Kitchen Cupboard at the Gardener of Eden.

Thursday, April 26, 2012

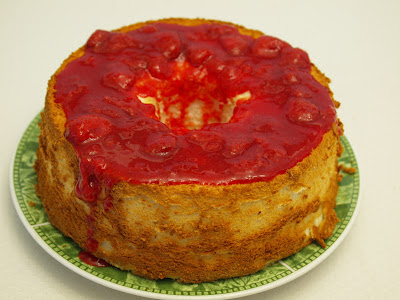
Thursday's Kitchen Cupboard... Angel Food Cake with Strawberry Sauce

Nothing screams spring more than the first delicious strawberries from the garden.  Nothing goes better with juicy strawberries than angel food cake.  I had to withhold from eating all the strawberries picked from the garden for two days so that I would have enough to make a strawberry sauce.. that was very, very difficult!


As for the angel food cake, my original plan was to buy one.  However, when I was at the grocery store I thought the angel food cakes were too pricey and I had a bunch of eggs at home, so why not make an angel food cake?  I am not a baker, but I figured as long as I have a recipe how hard could it be?

In searching for a recipe, I decided on the Heavenly Angel Food Cake.  I discovered that I didn't have the kitchen equipment to make an angel food cake, so I had to buy a pan and sifter (I said I'm not a baker!).  Remember this all began because I thought the store bought angel food cakes were too expensive, but after I bought a special pan and sifter I could have bought three bakery made cakes!  Anyway, after I assembled everything I followed the recipe exactly:

Heavenly Angel Food Cake

Ingredients

  • 12 eggs
  • 1 1/4 cups confectioners' sugar
  • 1 cup all-purpose flour
  • 1 1/2 teaspoons cream of tartar
  • 1 1/2 teaspoons vanilla extract
  • 1/2 teaspoon almond extract
  • 1/4 teaspoon salt
  • 1 cup sugar

Directions

  1. Separate eggs; discard yolks or refrigerate for another use. Measure egg whites, adding or removing whites as needed to equal 1-1/2 cups. Place in a mixing bowl; let stand at room temperature for 30 minutes.
  2. Meanwhile, sift confectioners' sugar and flour together three times; set aside. Add cream of tartar, extracts and salt to egg whites; beat on high speed. Gradually add sugar, beating until sugar is dissolved and stiff peaks form. Fold in flour mixture, 1/4 cup at a time. Gently spoon into an ungreased 10-in. tube pan. Cut through batter with a knife to remove air pockets. Bake at 350 degrees F for 40-45 minutes or until cake springs back when lightly touched. Immediately invert pan; cool completely before removing cake from pan. 
And this is how it turned out:

I was so proud of this cake!  I sat there and squished the cake and watched it bounce back for probably about 10 minutes!  

After I was thoroughly impressed with my first successful angel food cake, I moved on to making the strawberry sauce.  

Strawberry Topping
Ingredients
  • 1 pint strawberries, cleaned and stemmed
  • 1/3 cup white sugar
  • 1 teaspoon vanilla
Directions
  1. Cut all of the strawberries in half and set aside about 1/3 of them. In a saucepan over medium high heat, combine the remaining strawberries, sugar and vanilla. Cook, stirring occasionally, until sauce thickens, about 5 minutes. Remove from heat. In a blender, puree about 1/3 of sauce, then mix back into remainder and add uncooked strawberries. Store in refrigerator.
 Here's the cake with strawberry sauce:


I would prefer more strawberry sauce, but that was all the strawberries I had at the time and this cake was not going to last long enough for more berries to ripen!

Finally, while I was on a homemade roll, I decided to make some whipped topping in the mixer.

Whipped Topping 

Ingredients
  • 1 cup heavy cream
  • 1 teaspoon vanilla extract
  • 1 tablespoon confectioners' sugar 
Directions
  1. In a large bowl, whip cream until stiff peaks are just about to form. Beat in vanilla and sugar until peaks form. Make sure not to over-beat, cream will then become lumpy and butter-like. 
Whew, my spring dessert is now complete and ready to eat:
 Yum!  The dessert's lifespan was very short- two days before it was completely devoured.  Now since I have all the equipment for making angel food cakes, I think I need to make more.

That's what has been cooking in my kitchen.  If you want to peak into other kitchens and see what others are cooking, head over to Thursday’s Kitchen Cupboard at the Gardener of Eden.

Thursday, April 12, 2012

Thursday's Kitchen Cupboard... Beets and Pasta

This week's dish is a bit of a random concoction.  I'm normally very much of a recipe person.  I like instructions and not too adventurous when it comes to cooking- trying to change my ways!

Here's my beet and pasta recipe (not much of a recipe- more likely loose guidelines):

First, I roasted the beets in a baking pan with about 1/4" of water in the bottom and covered with aluminum foil.  I baked them for about 45 minutes.  After they cooled a bit I removed the skins and quartered them.  I sauteed the beet leaves in olive oil and tossed with pasta.  I added the roasted beets, some cilantro, and sprinkled with mozzarella.


I love all the different beet colors.. yellow, dark purple, and red.  I very easy dish plus I ate beet leaves for the second time!

That's what has been cooking in my kitchen.  If you want to peak into other kitchens and see what others are cooking, head over to Thursday’s Kitchen Cupboard at the Gardener of Eden.

Thursday, March 29, 2012

Thursday's Kitchen Cupboard... Pasta with Sauteed Swiss Chard and Pac Choi Stir Fry

With the rapid arrival of spring many of the crops that have been small and pathetic all winter have suddenly sprung to life.  One of these is my Swiss chard:


In looking for Swiss chard recipes I came across Jeanette's Healthy Living Blog and a recipe for Pasta with Sauteed Swiss Chard.


Pasta with Sauteed Swiss Chard

Ingredients:

  • 1 bunch swiss chard or other leafy green vegetable
  • 2 tablespoons olive oil
  • 1 large or 2 small shallots, thinly sliced (I used onion)
  • 4 garlic cloves, minced
  • 1 tablespoon capers, rinsed and drained (I didn't have any capers, so I left this out)
  • 1/2 pound whole grain pasta or gluten-free pasta, cooked al dente
  • 1-2 tablespoons extra virgin olive oil
  • freshly grated parmesan cheese or nutritional yeast (dairy-free/vegan option)
  • salt and fresh ground black pepper, to taste

Directions:

  1. Trim tough ends of swiss chard. Slice stems and leaves into thin strips.
  2. Heat olive oil in a large saute pan and add sliced swiss chard stems and shallots (or onions).
  3. Saute until shallots are softened, about 2-3 minutes.
  4. Add garlic and capers, and saute another minute. Season to taste with salt and fresh ground black pepper.
  5. Toss cooked pasta with sauteed swiss chard and a little extra virgin olive oil to loosen up the pasta.
  6. Sprinkle with freshly grated parmesan cheese and fresh ground pepper as desired. 
It was a tasty and easy weekday dinner!

If you remember I harvested a bunch of pac choi a few weeks ago.  I'm still working on eating it and  thought I would share one of my stir fries with pac choi, broccoli, carrots (only the white ones are from my garden), green bell peppers (not from garden either), and cauliflower.  I simply saute the veggies with some olive oil and soy sauce and with noodles and tofu (for me) or chicken (for Jeff).


That's what has been cooking in my kitchen.  If you want to peak into other kitchens and see what others are cooking, head over to Thursday’s Kitchen Cupboard at the Gardener of Eden.